AI workflow orchestration with state machines
Edit on GitHubThis guide shows you how to build multi-step, multi-agent AI workflows using Spryker state machines. By combining state machines with the AiFoundation module, you can orchestrate complex AI processes where agents execute tasks, make decisions based on results, and trigger subsequent steps.
Overview
Spryker state machines provide a powerful framework for orchestrating AI workflows:
- States: Represent stages in your workflow (for example, “analysis_done”, “awaiting_review”)
- Events: Trigger state transitions (for example, “analyze_agent” executes an AI call)
- Commands: Execute AI operations, tool calls, or business logic
- Conditions: Evaluate workflow item data to decide the next state (for example, “is_successful?”)
- Context data: Passed through the workflow to accumulate results and drive decisions
This creates a directed graph where conditions act as edges determining the next state based on AI-generated outputs.
Key concepts
- Context data: A key-value array that flows through the state machine, allowing commands to read input and write results for conditions to evaluate
- Structured response: AI responses converted to structured data, enabling deterministic decision-making
- Command plugins: Execute AI calls and update context with results
- Condition plugins: Evaluate context data to determine workflow progression
- Process name: Links XML definition to PHP configuration and state machine execution
Create a workflow process example
1. Define the state machine XML
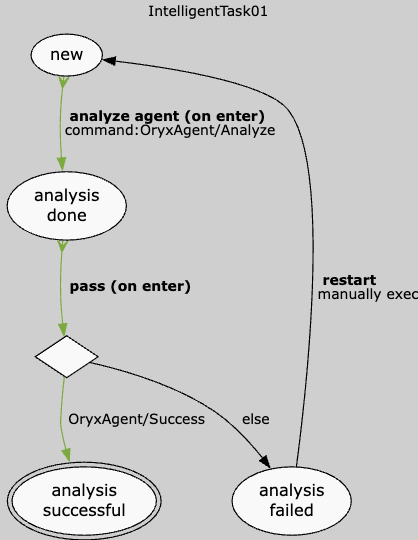
Example: IntelligentTask01
Create config/Zed/StateMachine/AiWorkflow/IntelligentTask01.xml:
<?xml version="1.0"?>
<statemachine
    xmlns="spryker:state-machine-01"
    xmlns:xsi="http://www.w3.org/2001/XMLSchema-instance"
    xsi:schemaLocation="spryker:state-machine-01 http://static.spryker.com/state-machine-01.xsd">

    <process name="IntelligentTask01" main="true">
        <states>
            <state name="new"/>
            <state name="analysis done"/>
            <state name="analysis successful"/>
            <state name="analysis failed"/>
        </states>

        <events>
            <!-- onEnter="true" triggers the command automatically when entering source state -->
            <event name="analyze agent" onEnter="true" command="OryxAgent/Analyze"/>
            <event name="pass" onEnter="true"/>
            <event name="restart" manual="true"/>
        </events>

        <transitions>
            <!-- Initial transition: execute command on entry -->
            <transition happy="true">
                <source>new</source>
                <target>analysis done</target>
                <event>analyze agent</event>
            </transition>

            <!-- Happy path: condition passes -->
            <transition happy="true" condition="OryxAgent/Success">
                <source>analysis done</source>
                <target>analysis successful</target>
                <event>pass</event>
            </transition>

            <!-- Unhappy path: condition fails (no condition = default) -->
            <transition>
                <source>analysis done</source>
                <target>analysis failed</target>
                <event>pass</event>
            </transition>

            <!-- Recovery: manual restart from failed state -->
            <transition>
                <source>analysis failed</source>
                <target>new</target>
                <event>restart</event>
            </transition>
        </transitions>
    </process>
</statemachine>
2. Create command plugins
Command plugin example: Analyze data with Oryx Agent
<?php

use Generated\Shared\Transfer\AiWorkflowItemCollectionRequestTransfer;
use Generated\Shared\Transfer\StateMachineItemTransfer;
use Spryker\Zed\Kernel\Communication\AbstractPlugin;
use Spryker\Zed\StateMachine\Dependency\Plugin\CommandPluginInterface;

class OryxAgentAnalyzeCommandPlugin extends AbstractPlugin implements CommandPluginInterface
{
    public function run(StateMachineItemTransfer $stateMachineItemTransfer): void
    {
        $aiWorkflowItemTransfer = $this->loadWorkflowItem($stateMachineItemTransfer);

        $this->executeAnalysis($aiWorkflowItemTransfer);

        $request = (new AiWorkflowItemCollectionRequestTransfer())
            ->setIsTransactional(true)
            ->addAiWorkflowItem($aiWorkflowItemTransfer);

        $this->getAiFoundationFacade()->updateAiWorkflowItemCollection($request);
    }

    protected function loadWorkflowItem(
        StateMachineItemTransfer $stateMachineItemTransfer
    ): AiWorkflowItemTransfer {
        $idAiWorkflowItem = $stateMachineItemTransfer->getIdentifierOrFail();

        $aiWorkflowItemConditionsTransfer = (new AiWorkflowItemConditionsTransfer())
            ->addAiWorkflowItemId($idAiWorkflowItem);

        $aiWorkflowItemCriteriaTransfer = (new AiWorkflowItemCriteriaTransfer())
            ->setAiWorkflowItemConditions($aiWorkflowItemConditionsTransfer);

        $aiWorkflowItemCollection = $this->getAiFoundationFacade()
            ->getAiWorkflowItemCollection($aiWorkflowItemCriteriaTransfer);

        return $aiWorkflowItemCollection->getAiWorkflowItems()->offsetGet(0);
    }

    protected function executeAnalysis(AiWorkflowItemTransfer $aiWorkflowItemTransfer): void
    {
        $contextData = $aiWorkflowItemTransfer->getContextData();
        $promptMessage = $contextData['prompt'] ?? 'Please analyze this data.';

        $promptRequestTransfer = (new PromptRequestTransfer())
            ->setPromptMessage($promptMessage);

        $promptResponseTransfer = $this->getAiFoundationFacade()->prompt($promptRequestTransfer);

        $contextData['analysis_result'] = $promptResponseTransfer->getMessage();
        $contextData['success'] = $promptResponseTransfer->getIsSuccessful();
        $contextData['analyzed_at'] = time();

        $aiWorkflowItemTransfer->setContextData($contextData);
    }
}
3. Create condition plugins
Condition plugin example: Check Oryx Agent success flag
<?php

namespace Pyz\Zed\AiFoundation\Communication\Plugin\StateMachine\Condition;

use Generated\Shared\Transfer\StateMachineItemTransfer;
use Spryker\Zed\Kernel\Communication\AbstractPlugin;
use Spryker\Zed\StateMachine\Dependency\Plugin\ConditionPluginInterface;

class OryxAgentSuccessConditionPlugin extends AbstractPlugin implements ConditionPluginInterface
{
    public function check(StateMachineItemTransfer $stateMachineItemTransfer): bool
    {
        // Load workflow item
        $aiWorkflowItemTransfer = $this->loadWorkflowItem($stateMachineItemTransfer);

        // Read success flag set by command
        $contextData = $aiWorkflowItemTransfer->getContextData();
        return $contextData['success'] ?? false;
    }
}
4. Register plugins in AiFoundation dependency provider
<?php

namespace Pyz\Zed\AiFoundation;

use Pyz\Zed\AiFoundation\Communication\Plugin\StateMachine\Command\OryxAgentAnalyzeCommandPlugin;
use Pyz\Zed\AiFoundation\Communication\Plugin\StateMachine\Condition\OryxAgentSuccessConditionPlugin;
use Spryker\Zed\AiFoundation\AiFoundationDependencyProvider as SprykerAiFoundationDependencyProvider;

class AiFoundationDependencyProvider extends SprykerAiFoundationDependencyProvider
{
    protected function getAiWorkflowCommandPlugins(): array
    {
        return [
            'OryxAgent/Analyze' => new OryxAgentAnalyzeCommandPlugin(),
        ];
    }

    protected function getAiWorkflowConditionPlugins(): array
    {
        return [
            'OryxAgent/Success' => new OryxAgentSuccessConditionPlugin(),
        ];
    }
}
5. Configure active processes
Create or update src/Pyz/Zed/AiFoundation/AiFoundationConfig.php:
<?php

namespace Pyz\Zed\AiFoundation;

use Spryker\Zed\AiFoundation\AiFoundationConfig as SprykerAiFoundationConfig;

class AiFoundationConfig extends SprykerAiFoundationConfig
{
    public function getAiWorkflowActiveProcesses(): array
    {
        return [
            'IntelligentTask01',
        ];
    }

    protected function getAiWorkflowInitialStateMapForProcess(): array
    {
        return [
            'IntelligentTask01' => 'new',
        ];
    }
}
6. Enable state machine handler
Update src/Pyz/Zed/StateMachine/StateMachineDependencyProvider.php:
<?php

use Pyz\Zed\StateMachine\Communication\Plugin\StateMachine\AiWorkflowStateMachineHandlerPlugin;

protected function getStateMachineHandlerPlugins(Container $container): array
{
    return [
        new AiWorkflowStateMachineHandlerPlugin(),
    ];
}
7. Set up cron jobs to process state machine events
Update config/Zed/cronjobs/jenkins.php:
$jobs[] = [
    'name' => 'check-ai-workflow-conditions',
    'command' => '$PHP_BIN vendor/bin/console state-machine:check-condition AiWorkflow',
    'schedule' => '* * * * *',
    'enable' => true,
];

$jobs[] = [
    'name' => 'check-ai-workflow-timeouts',
    'command' => '$PHP_BIN vendor/bin/console state-machine:check-timeout AiWorkflow',
    'schedule' => '* * * * *',
    'enable' => true,
];

$jobs[] = [
    'name' => 'clear-state-machine-locks',
    'command' => '$PHP_BIN vendor/bin/console state-machine:clear-locks',
    'schedule' => '0 6 * * *',
    'enable' => true,
];
8. Trigger a workflow with state machine
To start a workflow, create a workflow item with initial context data and trigger the state machine for it.
Create a workflow item and trigger the state machine:
<?php

use Generated\Shared\Transfer\AiWorkflowItemCollectionRequestTransfer;
use Generated\Shared\Transfer\AiWorkflowItemTransfer;
use Generated\Shared\Transfer\StateMachineProcessTransfer;
use Spryker\Shared\AiFoundation\AiFoundationConstants;

// 1. Create a workflow item with initial context data
$request = (new AiWorkflowItemCollectionRequestTransfer())
    ->setIsTransactional(true)
    ->addAiWorkflowItem(
        (new AiWorkflowItemTransfer())->setContextData([
            'prompt' => 'Analyze this data.',
            'status' => 'initialized',
        ]),
    );

$response = $this->aiFoundationFacade->createAiWorkflowItemCollection($request);
$workflowItem = $response->getAiWorkflowItems()->offsetGet(0);

// 2. Trigger the state machine for the newly created item
$processTransfer = (new StateMachineProcessTransfer())
    ->setProcessName('IntelligentTask01')
    ->setStateMachineName(AiFoundationConstants::AI_WORKFLOW_STATE_MACHINE_NAME);

$this->stateMachineFacade->triggerForNewStateMachineItem($processTransfer, $workflowItem->getIdAiWorkflowItem());
Trigger a manual event:
<?php

use Generated\Shared\Transfer\StateMachineItemTransfer;

$stateMachineItemTransfer = (new StateMachineItemTransfer())
    ->setIdentifier($workflowItem->getIdAiWorkflowItem())
    ->setStateMachineName(AiFoundationConstants::AI_WORKFLOW_STATE_MACHINE_NAME)
    ->setProcessName('IntelligentTask01');

$this->stateMachineFacade->triggerEvent('restart', $stateMachineItemTransfer);
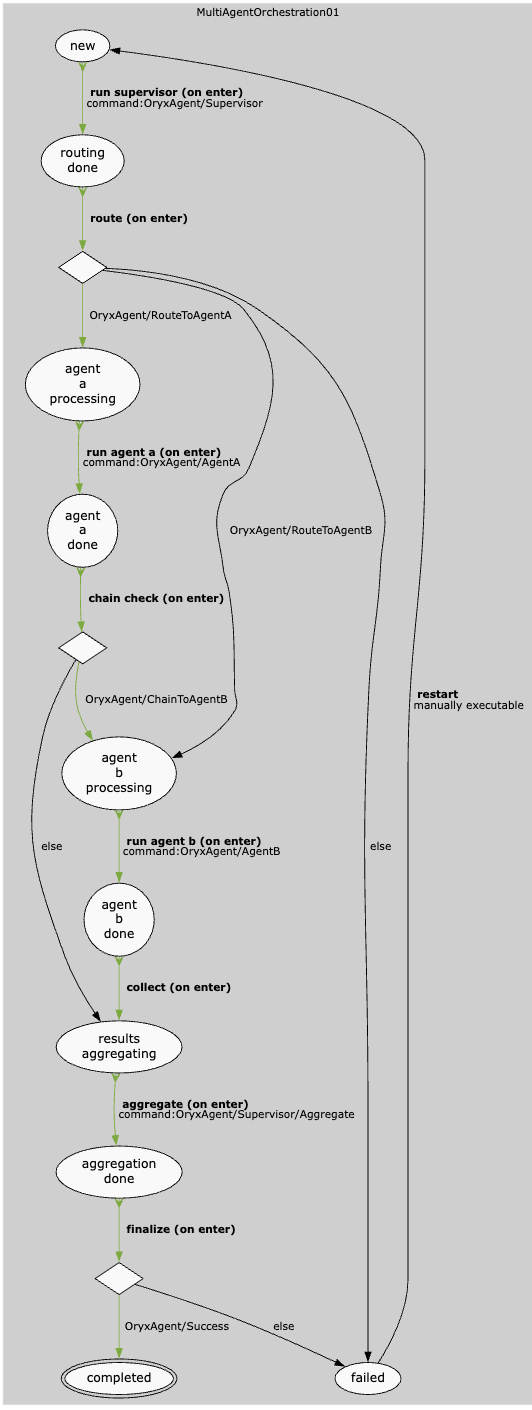
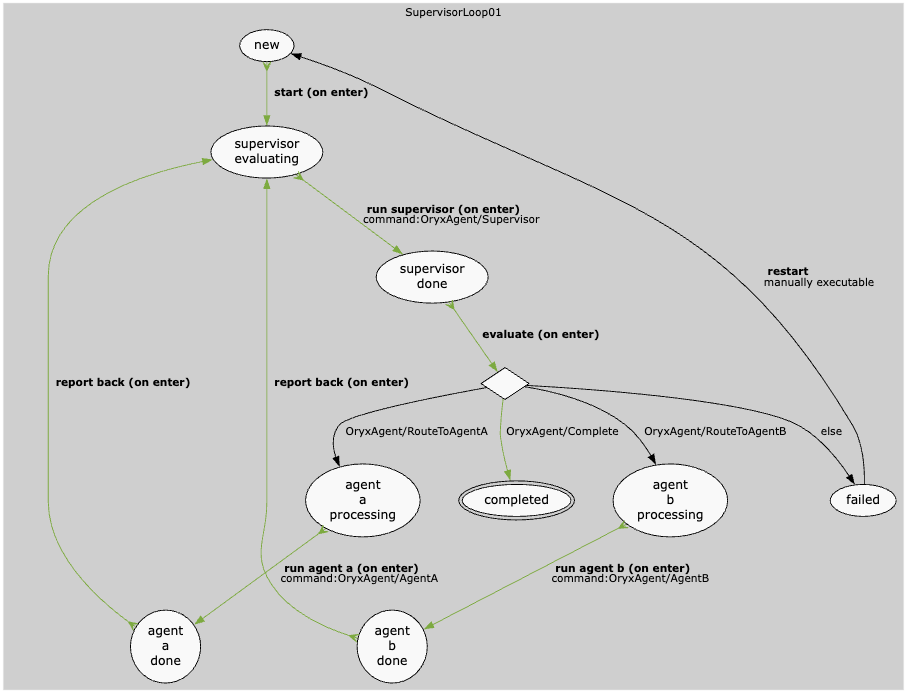
Multi-agent orchestration patterns
There are many possible patterns for multi-agent orchestration. The following are a couple of examples implemented using the Spryker AiWorkflow state machine.
Multi-agent routing workflow
Multi-agent supervision workflow
Navigation configuration
To enable navigation to the Workflows in the Zed admin panel, add navigation items to your config/Zed/navigation.xml file.
Add navigation XML
Update config/Zed/navigation.xml to include the Workflows menu:
<config>
    <ai-foundation>
        <label>Intelligence</label>
        <title>Intelligence</title>
        <icon>network_intel_node</icon>
        <pages>
            <ai-workflow>
                <label>Workflows</label>
                <title>Workflows</title>
                <bundle>ai-foundation</bundle>
                <controller>ai-workflow</controller>
                <action>index</action>
            </ai-workflow>
        </pages>
    </ai-foundation>
</config>
This navigation configuration:
- Adds an Intelligence menu item in the Zed admin panel
- Includes a Workflows submenu to access the workflows monitoring interface
- Sets the icon and labels for improved user experience
- Defines URLs to route to the workflows overview and detail pages
Monitoring
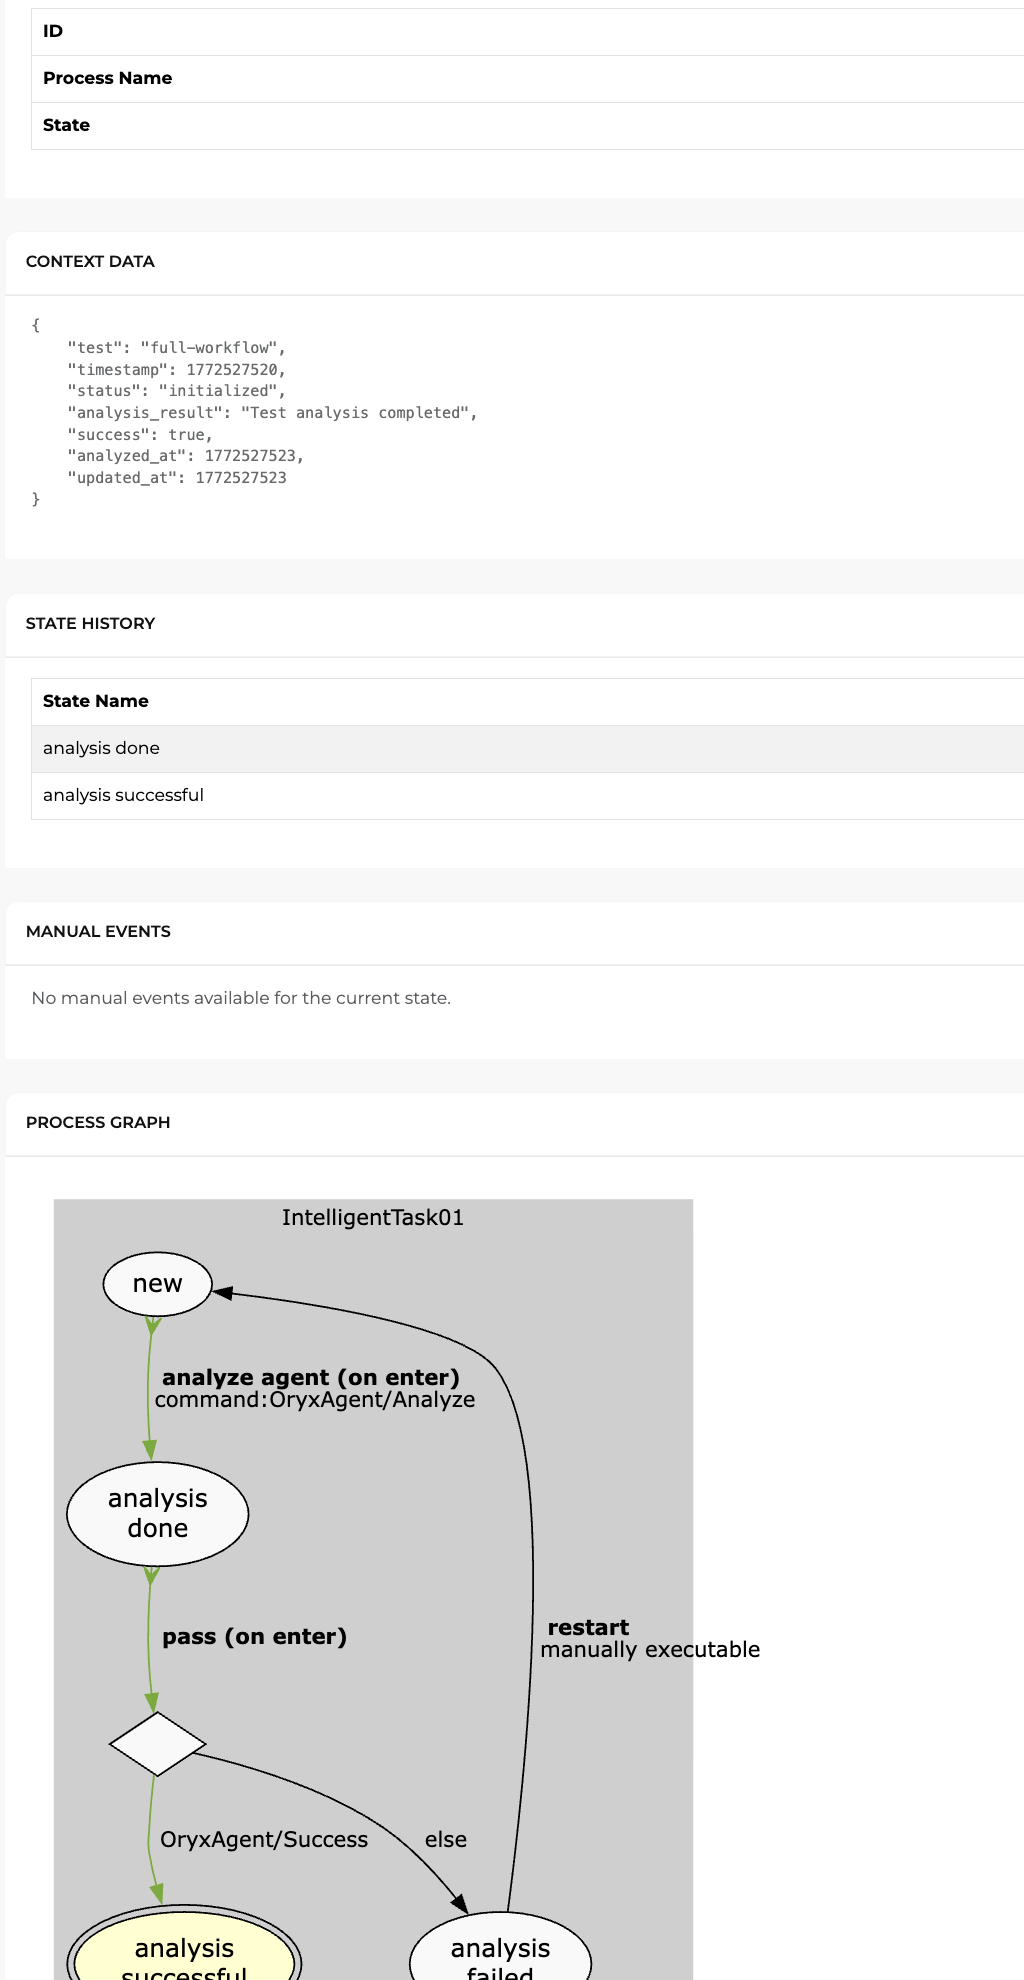
You can monitor AI workflows in the Spryker Zed administration panel. The monitoring interface provides visibility into workflow execution, state transitions, and context data.
View workflow details
To view detailed information about a specific workflow item, click the View button in the actions column. The detail page displays the following information:
- Current State: Shows the workflow item ID, process name, and current state
- Context Data: Displays the JSON context data that flows through the workflow, including input data and results from executed commands
- State History: A table showing all states the workflow item has passed through and the timestamps when each state was entered
- Manual Events: If manual events are available for the current state, you can trigger them directly from the admin panel (useful for testing or recovery scenarios)
- Process Graph: A visual representation of the state machine process with the current state highlighted
Trigger manual events
If a workflow is waiting for a manual event or you need to change its course, you can trigger manual events from the workflow detail page. Manual events appear as buttons under the Manual Events section. Only events that are valid for the current state are displayed.
Best practices
- Keep context simple: Store only the data that conditions need to evaluate the next step and that subsequent commands need to process
- Use structured responses: Convert AI responses to structured data before storing in context
- Name explicitly: Use descriptive command and condition names matching the process name
- Document context schema: Define what keys each command and condition expects in context data
Thank you!
For submitting the form