Managing merchant orders
Edit on GitHubThis document describes the actions a merchant can do in the Orders section of the Merchant Portal.
Prerequisites
To start managing merchant orders, navigate to Merchant Portal > Orders.
You manage merchant orders by changing the states of the items inside the order. This way, you can see that item was delivered or returned.
Each section contains reference information. Make sure to review it before you start, or look up the necessary information as you go through the process.
Changing merchant order states
To change the state of items in a merchant order:
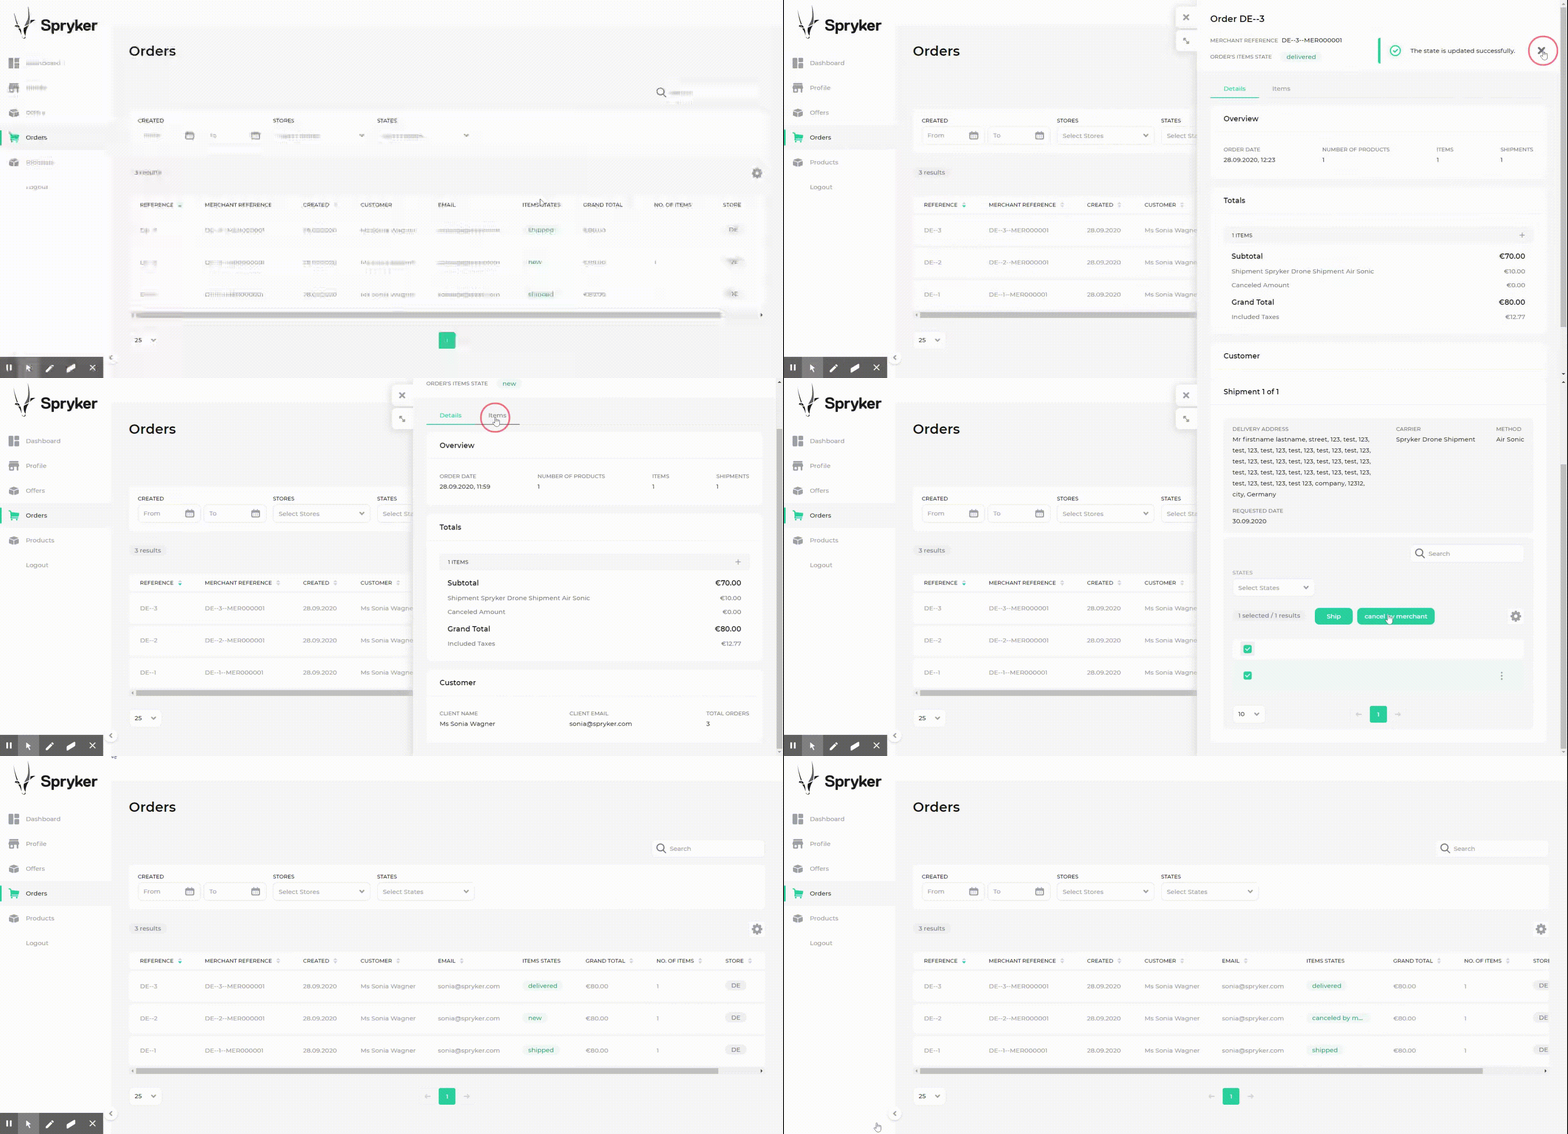
- In the list of orders, click the order you want to change the state for or click Details next to it. You are taken to the Order [Order ID] page.
- In the upper right corner, click the corresponding trigger button to update the state. The page refreshes to show the message about the successful state change.
- Repeat step 2 until you get the desired order state. The succession of the steps depends on the merchant state machine that is set up.
Tips & tricks
Merchant order items can have multiple trigger buttons. When you click one of those buttons, only items with a manually executable event are updated. All other items remain in that state until their trigger has been performed. For more details, see Marketplace state machine
Changing merchant order item states
To change the state of a single item in a merchant order:
- In the list of orders, click the order line or click Details next to the order you want to change the status for. You are taken to the Order [Order ID] page.
- Switch to the Items tab.
- Next to the item you want to change the state for, click the corresponding state. The page refreshes to show the message about the successful state change.

Tips and tricks
To update the states of the merchant order items in bulk:
-
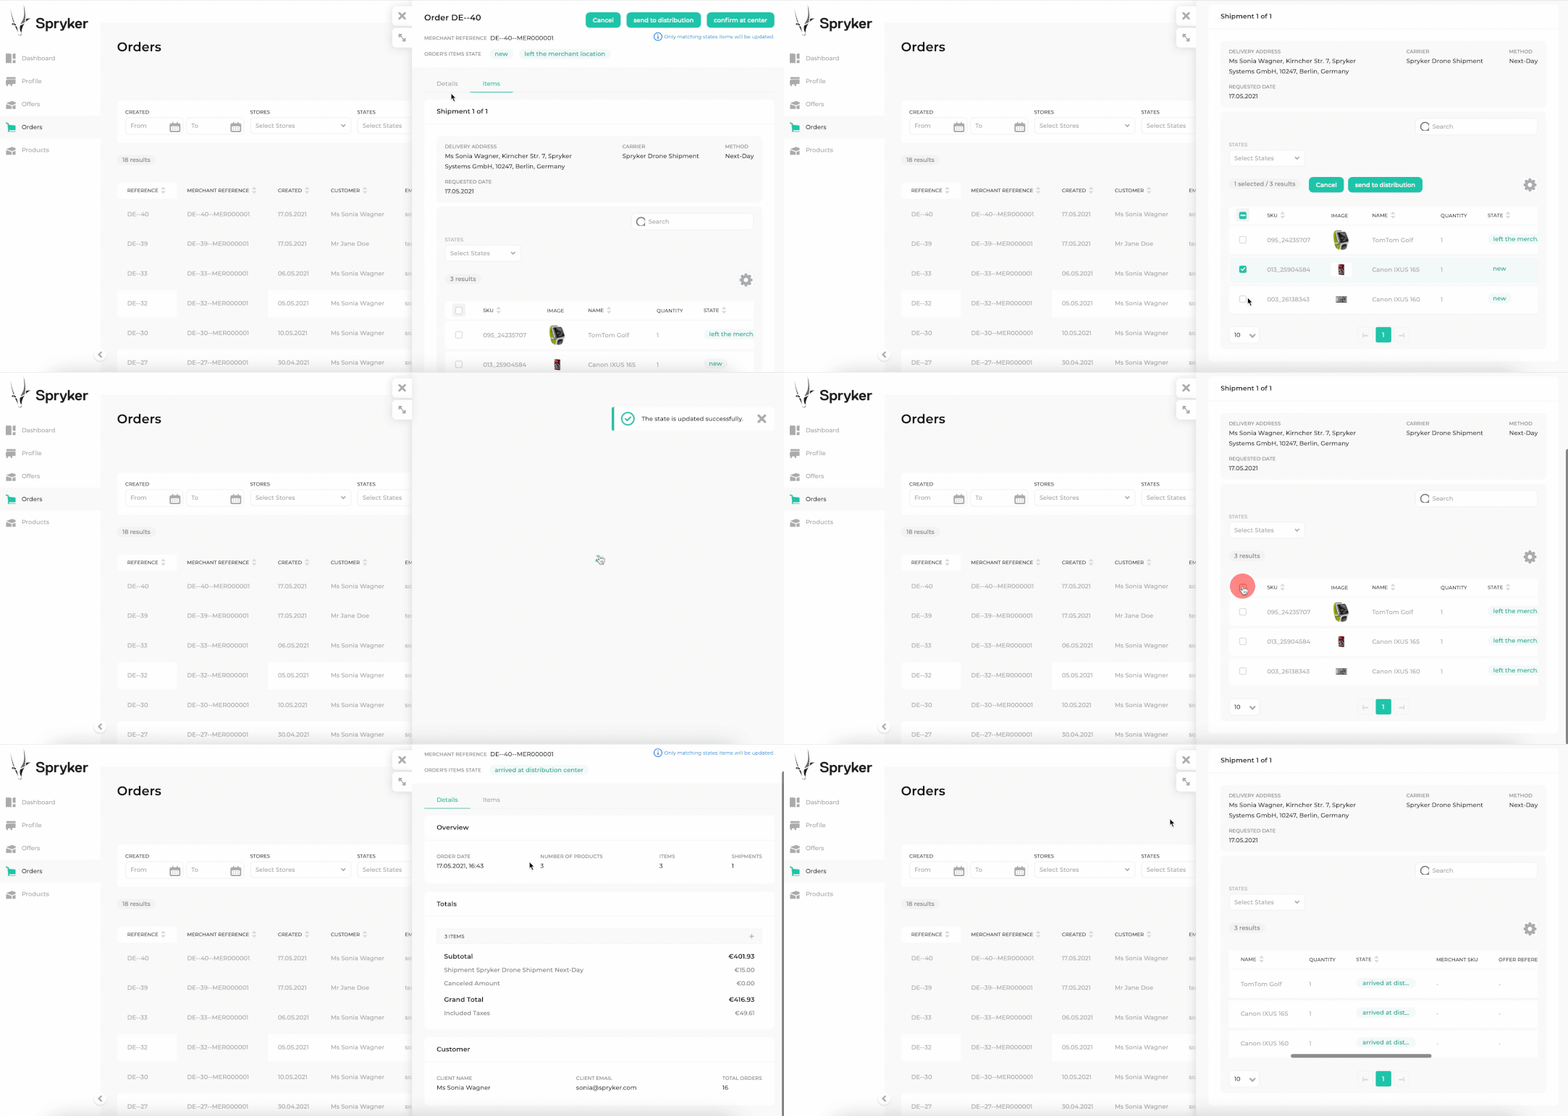
In the list of orders, click the order you want to change the state for or click Details next to it. You are taken to the Order [Order ID] page.
-
Navigate to the Items tab of the Order [Order ID] page.
-
Select in checkboxes the products you want to update the state of, and click the available button state that appeared after the selection. You can also click a button state on the top right of the drawer to update the state of all the items that match this state.

Bulk updates can only be done for items that share the same state.
Reference information: Changing merchant order states
This section describes attributes you see when you change merchant order states.
Orders table
Orders is the table that appears when you open the Orders section in the navigation menu in the Merchant Portal.
By default, the last created order goes on top of the table. However, you can sort the table by:
- Marketplace order reference
- Merchant order reference
- Created date
- Customer’s name
- Customer’s email address
- Merchant order grand total
- No. of items
- Store
Tips and tricks
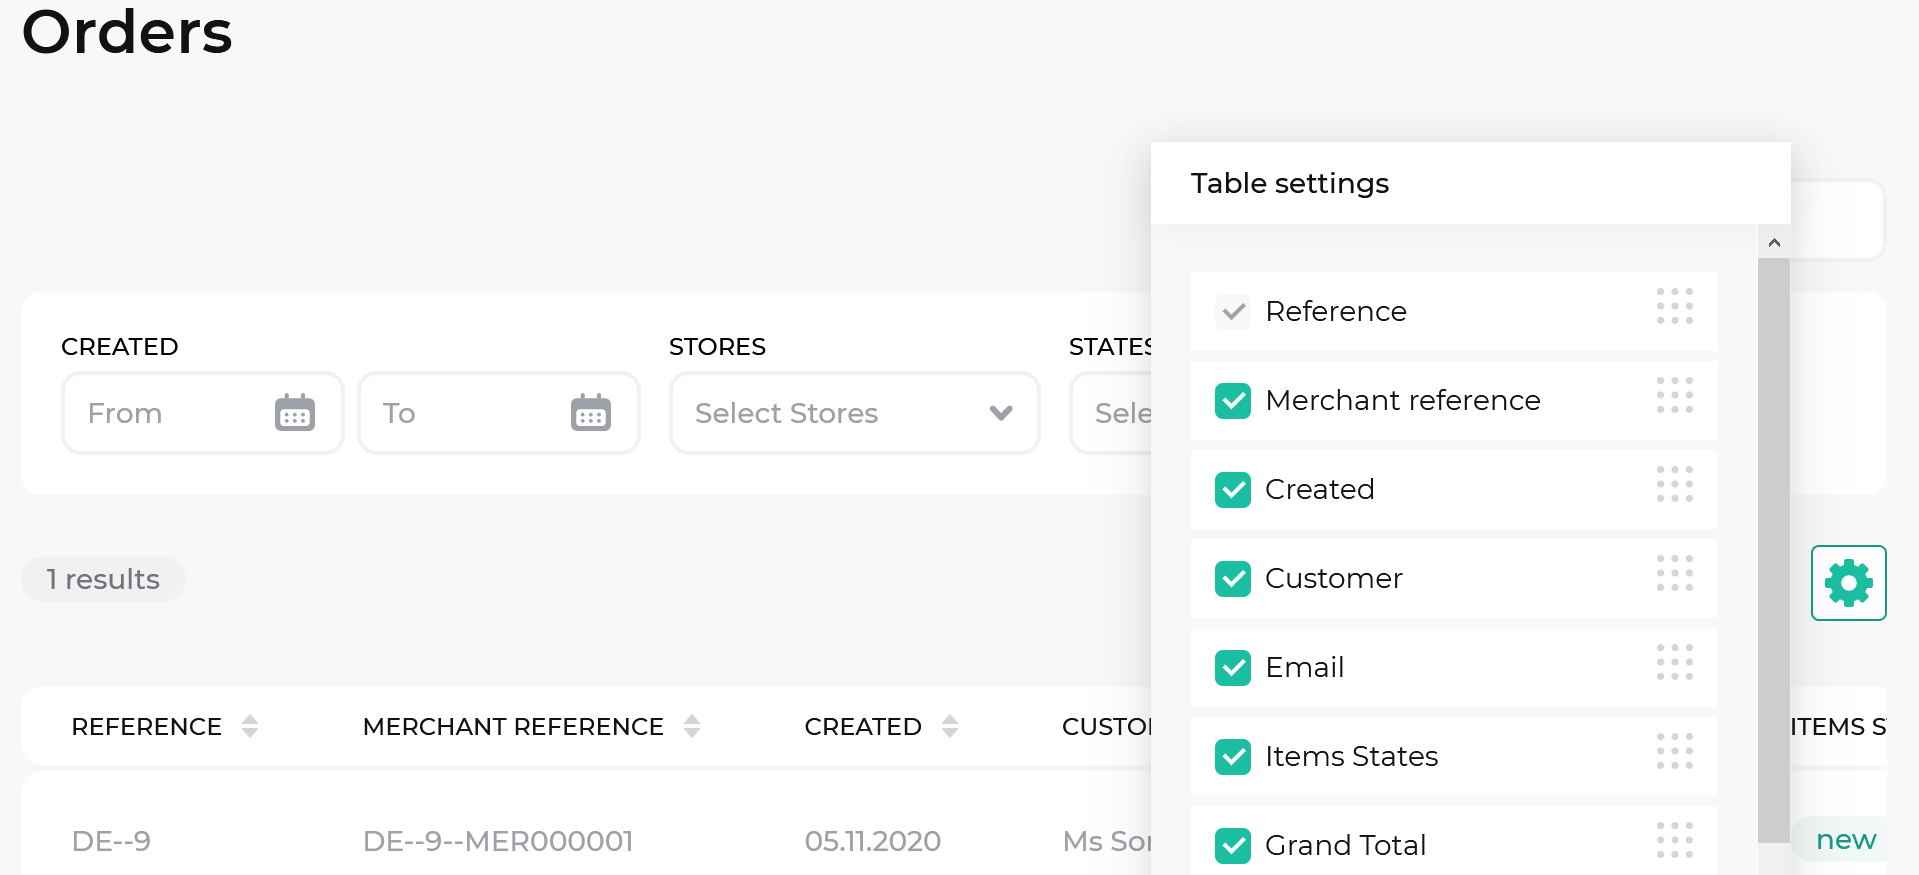
You can rearrange the order of the columns, hide and show the columns again by clicking the settings cogwheel next to the table.

Order [Order ID] page
The Order [Order ID] page is the page that opens in the drawer when you click one of the orders in the Orders table.
The following table describes the sections on the [Order ID] page:
| TAB | SECTION | DESCRIPTION |
|---|---|---|
| Details | Overview | Contains the merchant order date, number of products purchased, number of items in the merchant order, and the number of shipments. |
| Details | Totals | Contains information about the merchant order totals. |
| Details | Customer | Contains the customer’s name, email, and the number of orders the customer has made from this merchant. |
| Items | Shipments | Contains information about shipments, such as the number of shipments, delivery address, shipment carrier and delivery method, and the requested date. |
| Items | Order Items | Contains information about every item in the merchant order, including:
|
Tips and tricks
You can search the items in the merchant order and filter them according to their state by selecting the necessary state in the State drop-down menu.
Merchant order states
The merchant can set different states for the order depending on the state machine that is configured for this merchant. The following table describes the states a merchant can select:
| ORDER STATE | DESCRIPTION |
|---|---|
| new | Initial order state. |
| Cancel | Select this state to cancel the order. When triggering this state, the item status becomes canceled by merchant. |
| Ship | Select this state once the order is shipped. When you trigger this state, the item status becomes shipped. |
| Deliver | Select this state once the order is delivered to the shopper. When you select deliver, the state becomes delivered. |
| Send to distribution | Select this state once the order is at the distribution center. When you trigger this state, the item status becomes left the merchant location. |
| Confirm at center | Select this state when the distribution center confirmed the order arrival. When you trigger this state, the item status becomes arrived at distribution center. |
| Execute return | Select this state when you want to execute the return. When you trigger this state, the item status becomes returned. |
| Refund | Select this state if a refund was issued to the customer for the order. When you trigger this state, the item status becomes refunded. |
| Cancel the return | Select this state when the return cannot be fulfilled. When you trigger this state, the item status becomes return canceled. |
| Send return back to customer | Select this state when you shipped the returned item back to the customer. When you trigger this state, the item status becomes shipped to customer. |
| Deliver return | Select this state when the returned item is delivered back to the customer. When you trigger this state, the item status becomes delivered. |
| Closed | Order becomes closed when the Back Office user closes it in the Back Office. |
Managing merchant returns
Once the return is created by the customer in the Storefront or by the Back Office user in the Back Office, the order obtains the waiting for return state.
Executing returns
To execute a return:
- In the list of orders, click Details next to the order you want to return. You are taken to the Order [Order ID] page.
- In the upper right corner, click Execute return. The page refreshes to show the message about the successful state change.
Canceling returns
To cancel a return:
- In the list of orders, click Details next to the order you want to cancel the return for. You are taken to the Order [Order ID] page.
- In the upper right corner, click Cancel return. The page refreshes to show the message about the successful state change.
Canceling merchant orders
Your content
To cancel an order:
- In the list of orders, click the order you want to cancel or click Details next to it. You are taken to the Order [Order ID] drawer.
- In the upper left corner, click Cancel. The page refreshes to show the updated merchant order state.
Tips and tricks
You can filter the existing merchant orders by:
- Creation date
- Stores where the order belongs
- Merchant order states
Thank you!
For submitting the form
