Manage marketplace orders
Edit on GitHubThis document describes how to manage marketplace orders.
Prerequisites
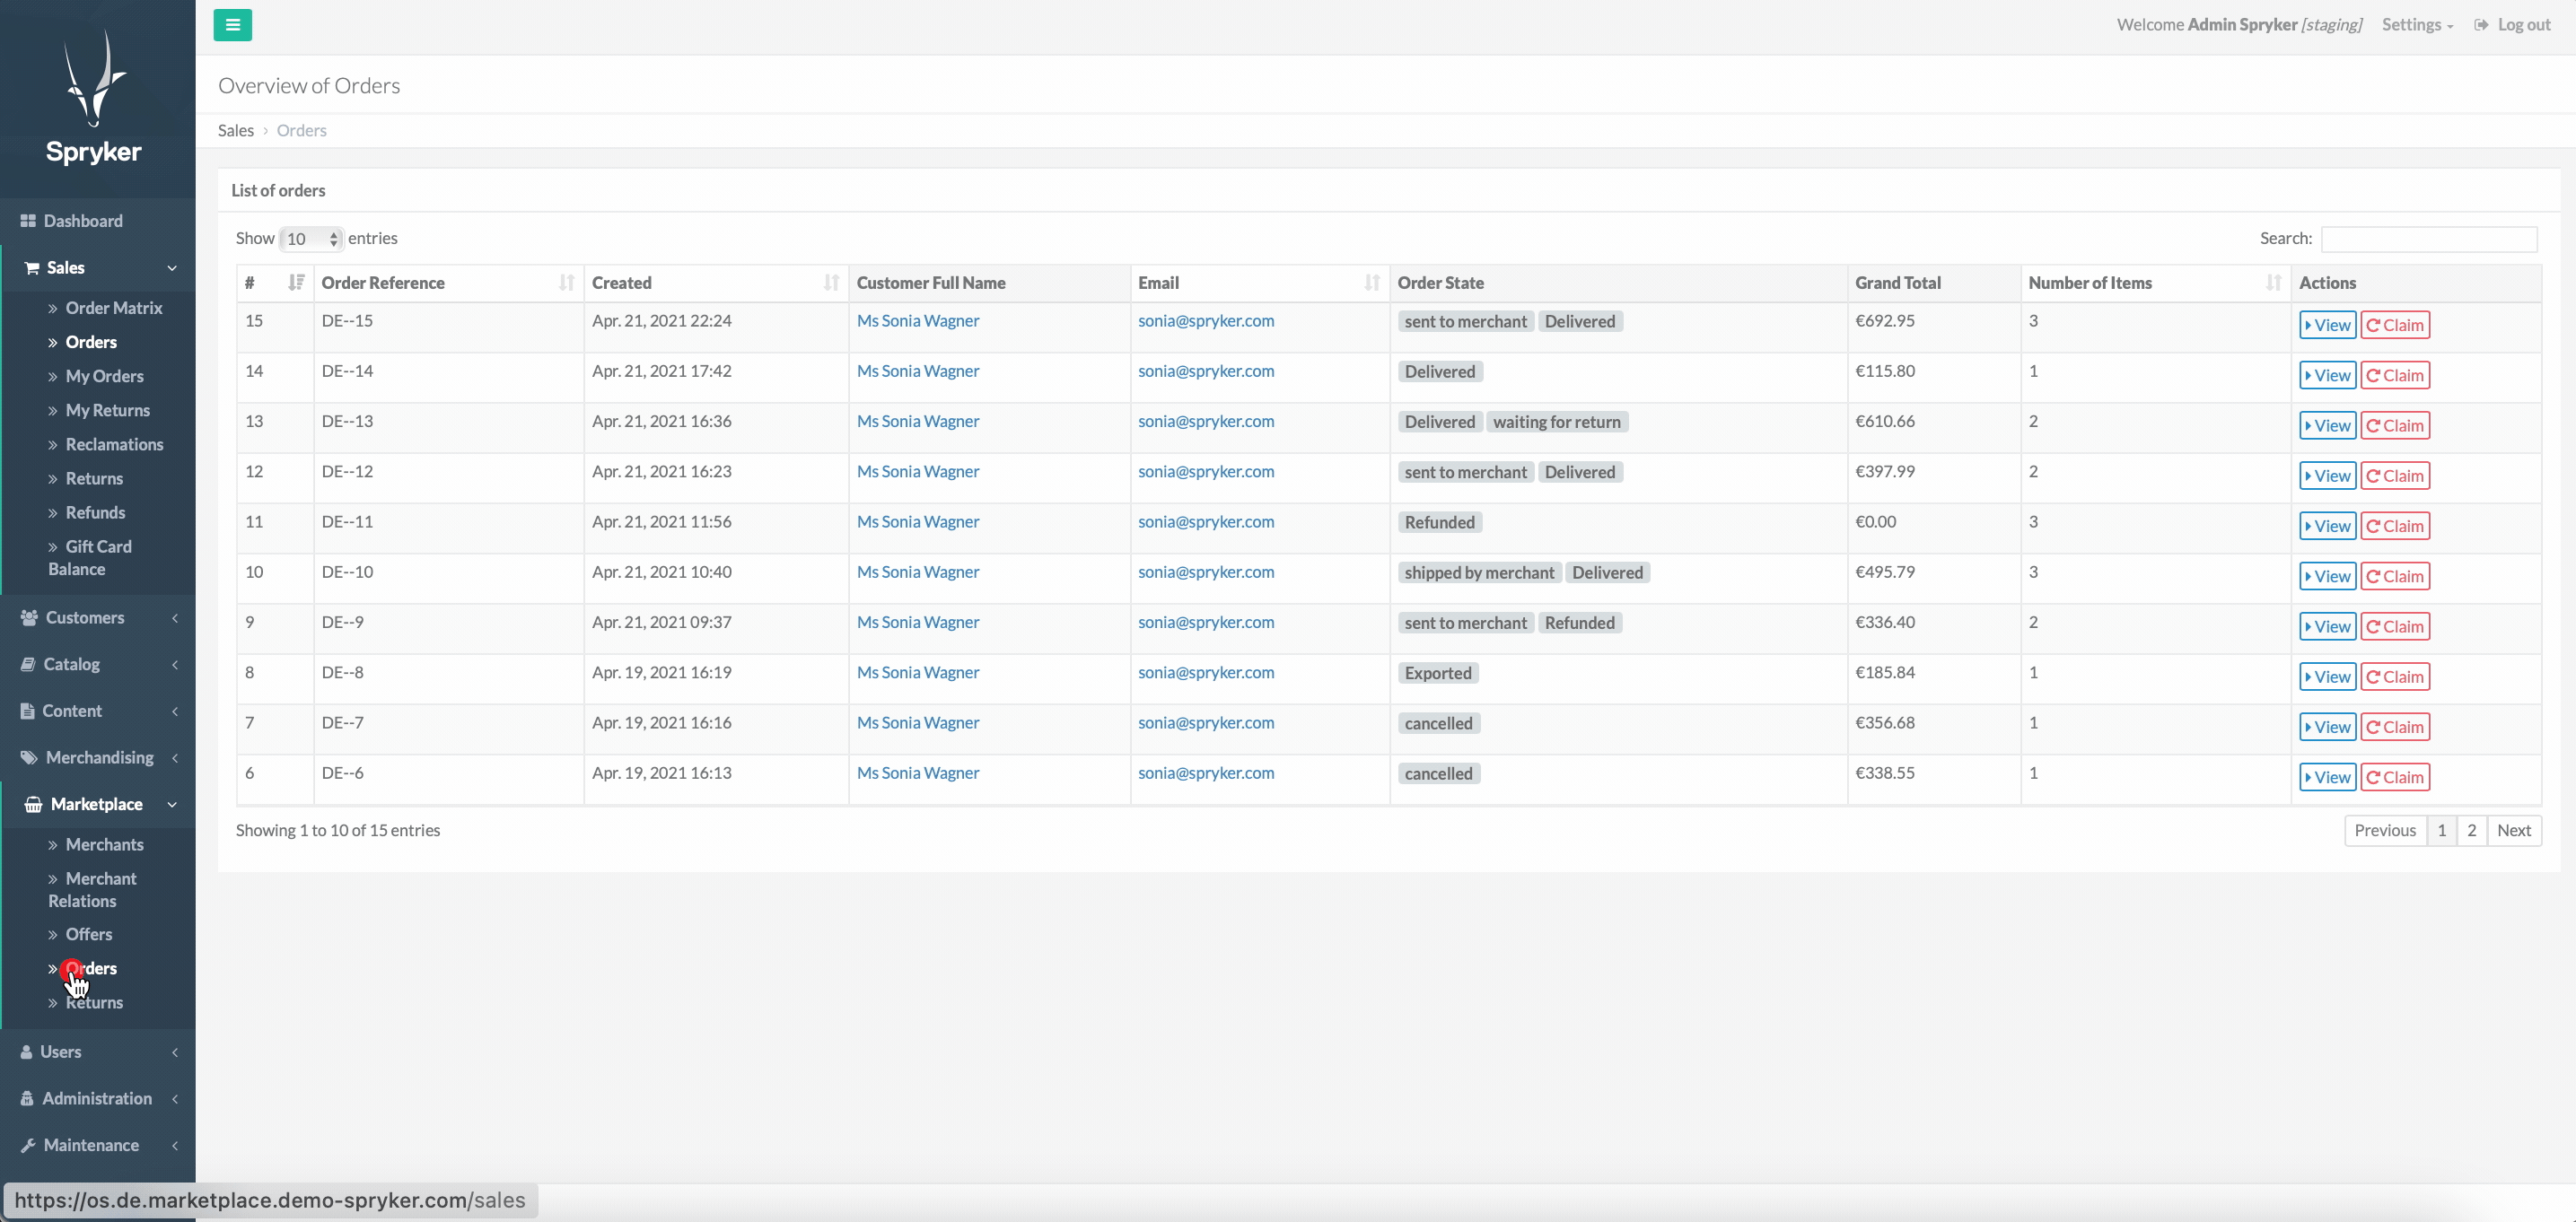
To start managing marketplace orders, navigate to Marketplace > Orders.
The instructions assume that there is an existing order with the New status.
Each section contains reference information. Make sure to review it before you start, or look up the necessary information as you go through the process.
Viewing marketplace orders
To view a marketplace order, in the List of orders table, next to the order you want to check, click View. You are taken to the View Order: [Order ID] page.
Every marketplace order contains information about the merchant orders it’s split into.
Reference information: Viewing marketplace orders
This section holds reference information related to viewing marketplace orders.
Orders page
The last created order goes on top of the table by default. However, you can sort the table by the order number, order reference, date of creation, customer emails, or the number of items ordered.
On the Orders page, you see the following:
- Order number, reference, and the creation date.
- Customer name and email.
- Order state, the grand total of the order, and the number of items ordered.
- Actions that you can do on this page.
By default, the last created order goes on top of the table. However, you can sort and search List of orders.
All columns with headers having arrows in List of orders are sortable.
Actions column
All the order management options that you can invoke from the Actions column in List of orders are described in the following table.
| ACTION | DESCRIPTION |
|---|---|
| View | Takes you to the View Order: [Return ID] page. Here, you can find all the information about the chosen order. |
| Claim | Takes you to the Create reclamation page, where you can create a reclamation for the order. |
View Order: [Order ID]
The following table describes the attributes on the View Order: [Order ID] page when you view an order.
| SECTION | ATTRIBUTE | DESCRIPTION |
|---|---|---|
| Order Overview | Section with the general information about the order. | |
| Order reference | Reference number of the order. | |
| Order date | Date when the order was placed. | |
| Unique Product Quantity | Number of unique products in the order. | |
| Totals | Contains information about the order totals. | |
| Subtotal | Subtotal of the order. | |
| Grand Total | Grand total of the order. | |
| Total taxes | Total tax amount. | |
| Refund total | Available refundable amount for the order. | |
| Trigger all matching states inside this order | Action button for changing the available states for all the items in the order. For details, see Changing marketplace order states. | |
| Custom Order Reference | Custom number that can be added to the order. | |
| Customer | Section with the information about the customer who has submitted the order. | |
| Reference | Unique reference of the customer in the system. The reference is clickable and leads to the View Customer page. | |
| Name | Name of the customer. | |
| Customer’s email address. | ||
| Previous orders count | Number of orders the customer has submitted. | |
| Billing address | Address that is used for billing purposes. | |
| Merchant orders | Section with details about every merchant order with its products and Shipment information. | |
| Fulfilled by Merchant | Contains the name of the Merchant this order belongs to. | |
| Order Reference | Merchant order reference. | |
| Delivery Address | Address used for delivery. | |
| Delivery Method | Delivery method chosen for the shipment. | |
| Shipping Method | Method used to ship the order. | |
| Shipping Costs | Price for shipping service. | |
| Request delivery date | Requested delivery date. | |
| Trigger all matching states of order inside this shipment | Action button for changing the available states for all the items in the shipment. For details, see Changing marketplace order states. | |
| Cart Notes | Section where the cart notes added by the customer are displayed (if there are any). | |
| Returns | Section with information related to returns (if there are any). | |
| Comments to Order | Section with comments added to the order by the customer when submitting it. | |
| Bundle Items Cart Notes | Section with the notes for the bundled items. | |
| Payments | Section with the information about payment performed y the customer (payment provider, payment method, and the amount paid). | |
| Gift cards | Section with the information about the gift cards. | |
| Discounts & Vouchers | Section with the information about discounts and vouchers applied to the order. | |
| Refunds | Section with information about refunds issued. | |
| Order Source | Source of the order. | |
| Comments | Section for the Back Office users to add comments to the order. These comments are not visible to the customer. |
Changing marketplace order states
To change the state of several items in the order:
- In the List of orders table, in the Actions column, click View next to the order you want to change the state of. You are taken to the View Order: [Order ID] page.
- In the Trigger all matching states inside this order section, click the next available state. For details about the available states, see Marketplace and Merchant state machines feature overview. The page refreshes to show the message about the successful state change. The order will obtain the updated state. In the Trigger all matching states inside this order section, you can see the Cancel button.
- Repeat step 2 until you get the desired order state.
To change the state of the order items in a shipment:
- In List of orders, click View next to the order possessing the items you want to change the state of. You are taken to the View Order: [Order ID] page.
- Scroll down to the desired shipment.
- Select the checkbox next to the products you want to change the state of.
- In the Trigger all matching states of order inside this shipment section, click the next available state. For details about the available states, see Marketplace and Merchant state machines feature overview. The page refreshes to show the message about the successful state change. In the Trigger all matching states of order inside this shipment section of the modified shipment, you can see the updated state.
- Repeat step 4 until you get the desired shipment state.
To change the state of an item in the merchant order:
- In List of orders, click View next to the order possessing the items you want to change the state of. You are taken to the View Order: [Order ID] page.
- Scroll down to the desired item.
- In the Trigger event column next to the desired product, click the next available state. For details about the available states, see Marketplace and Merchant state machines feature overview. The page refreshes to show the message about the successful state change. In the Trigger event column next to the product, you can see the Cancel button.
Reference information: Changing marketplace order states
You can set different states for your order by clicking the action buttons. The following describes the triggers you can call:
| ORDER STATE | DESCRIPTION |
|---|---|
| Pay | Click this button once you receive the payment for the order from your customer. |
| Picking list generation schedule | Select this state to generate a picklist. Available with the Fulfillment App. |
| Prepare for picking | Makes the picklist available in the Fulfillment App. Available with the Fulfillment App. |
| Cancel | Click this button to cancel the order on the customer’s behalf. |
| Close | Click this button when your customer has successfully received the ordered items and is satisfied with their quality. |
| Refund | Click this button in case of a refund. |
| Return | Click this button if the customer returns you either all or several items from the order. |
Tips & tricks
To change the state of all the items inside a shipment at once, in the Trigger all matching states of order inside this shipment section of the corresponding shipment, click the next available state.
For reference information about the Orders and View Order: [Order ID] pages, on this page, see:
- Orders page
- [View Order: Order ID
Creating a marketplace return
To be able to create a return, your marketplace state machine should have the return subprocess set up.
If an order item is returnable, you can create a return for it.
To create a return:
- On the View Order: [Order ID] page, click Return in the top right corner. This opens the Create Return page.
- On the Create Return page, select the items you want to return and optionally the return reason for the items. The following return reasons are provided out of the box:
- Damaged
- Wrong item
- No longer needed
- Custom reason
The products from one merchant can be returned at a time.
- Click Create return. This creates the return and takes you to the Overview of Return [Return reference] page, where you can change the return states. For details about the return states you can trigger, see Marketplace return item states.
You can create returns for the items that are in Shipped or Delivered states only.
Reference information: Creating a marketplace return
| SECTION | ATTRIBUTE | DESCRIPTION |
|---|---|---|
| General information | ||
| Order reference | Reference of the order the return will be created for. Takes you to the View Order: [Order ID] page, where you can view and manage the order. | |
| Select Items to Return | ||
| Fulfilled by merchant | Name of the merchant the item belongs to. Takes to the Edit Merchant: [Merchant ID] page, where you can view and edit information about this merchant. | |
| Merchant Order Reference | Reference of the merchant order in the system. | |
| Product | List of all items included in the return. | |
| Quantity | Product quantity. | |
| Price | Product price. | |
| Total | Total amount paid for the item. | |
| Return policy | Return policy an item is controlled by. | |
| State | Return state for the item. |
Once a return has been created, it acquires the Waiting for return state. You can trigger the following states for the returns on the Overview of Returns [Return ID] page. For more details, see Marketplace and merchant state machines feature overview.
| RETURN STATE | DESCRIPTION |
|---|---|
| execute-return | Select this state if you accept the return. When triggering this state, the return status is changed to Returned. |
| refund | Select this state if you have refunded the returned items. When triggering this state, the return status is changed to Refunded. |
| cancel-return | You can trigger this state after the Waiting for return state. Select this state if either customer changed their mind and doesn’t want to make the return anymore, or you cancel the return because of the return policy, or for other reasons. When triggering this state, the return status is changed to Canceled. |
| ship-return | You can trigger this state after the Cancel return state. Select this state if you shipped the canceled return back to the customer. The return status is changed to Shipped to customer. |
| delivery-return | You can trigger this state after the Shipped to customer. Select this state if the return has been delivered to the customer. The return status is changed to Delivered. |
| close | You can trigger this state after the Delivered state. Select this state to close the return. The return status is changed to Closed. |
Viewing the returns for marketplace orders
If returns have been created for a marketplace order, they are displayed on the View Order: [Order ID] page, in the Returns section.
To view details about a return, navigate to the Returns page, and in the Actions column of the List of Returns table, click View. This takes you to the Overview of Return: [Return ID] page. For information about how you can manage the returns on this page, see Managing marketplace returns.
Reference information: Viewing the returns for marketplace orders
The following tables describe the attributes on the Overview of Return: [Return reference] page when you view a return.
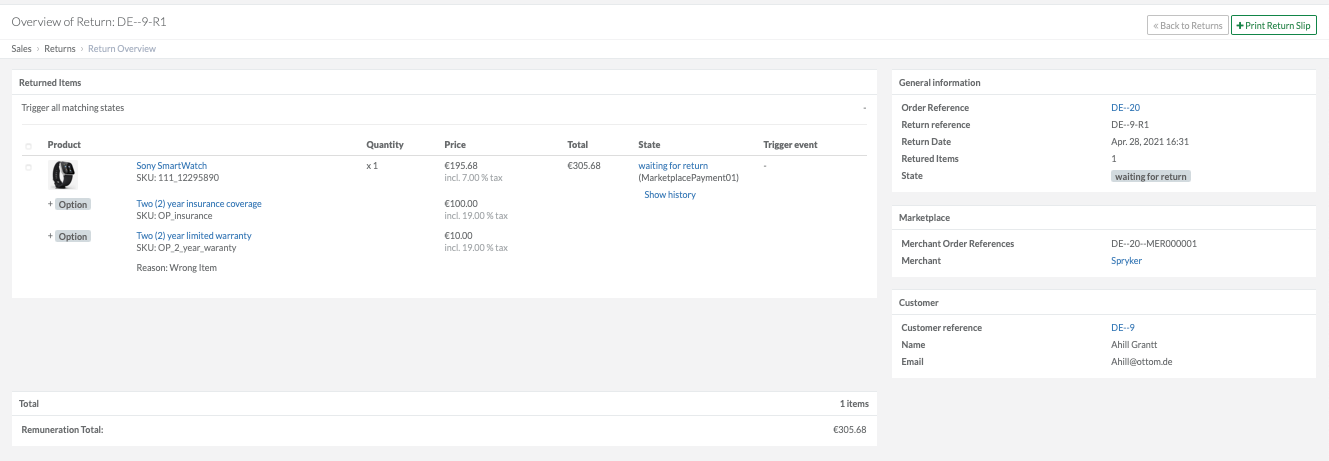
Returned items section
The returned items section displays information about the returned items.
| ATTRIBUTE | DESCRIPTION |
|---|---|
| Product | List of all items included in the return. |
| Quantity | Product quantity. |
| Price | Product price. |
| Total | Total amount paid for the item. |
| State | Return state for the item. |
| Trigger event | List of the events to trigger for the return. |
| Trigger all matching states | States that you can trigger for all items in the return at once. |
Total section
The Total section displays the total amount of items to be returned.
| ATTRIBUTE | DESCRIPTION |
|---|---|
| Order Reference | Reference number of the order. |
| Return Reference | Reference number of the return. |
| Return Date | Date when the return was created. |
| Returned Items | Number of items to be returned. |
| State | State of the return. |
Marketplace section
| ATTRIBUTE | DESCRIPTION |
|---|---|
| Merchant Order References | Merchant order reference number. |
| Merchant | Name of the merchant that sold the item. |
Customer section
| ATTRIBUTE | DESCRIPTION |
|---|---|
| Customer reference | Reference of the customer. |
| Name | Customer name. |
| Customer’s email address. |
Editing a Custom Order Reference for a marketplace order
To edit a custom order reference:
- In the List of orders table, next to the order you want to update the custom order reference of, click View.
- In the Custom Order Reference section of the View Order: [Order ID] page, click Edit Reference.
- Update the custom order reference.
- Click Save.

Tips and tricks
To remove the custom order reference, clear the Custom Order Reference field and click Save.
Claiming marketplace orders
To claim a marketplace order:
- On the Overview of Orders page, click Claim next to the order you want to create a reclamation for.
- On the Create reclamation page, select one or more products you want to create the reclamation for.
- Click Create Reclamation.
The page refreshes to show the success message about reclamation creation.
Tips and tricks
Claiming an order does not change the state of the order or the items inside the order. When a reclamation is created, a sales team member processes the order manually.
Reference information: Create reclamation page
| ATTRIBUTE | DESCRIPTION |
|---|---|
| Product | Contains information about the product: the product image, name, SKU, color. Clicking the product name takes you to the View Product Abstract: [Product ID] page. |
| Unit Price (GROSS_MODE) | Item price without taxes. |
| Item total | Total amount paid for the item. |
| State | Current state of the item. Clicking the state shows the state machine diagram. |
Commenting on marketplace orders
To comment on the marketplace order:
- Click View next to the order you want to comment on.
- On the View Order: [Order ID] page, scroll down to the Comments section.
- Enter the comment in the Message field.
- Click Send Message. The page refreshes to show the success message about comment creation. Your message is displayed in the Comments section.
Tips and tricks
- To send an email to a customer, on the Overview of Orders page, click the hyperlinked customer email in the Email column.
- To view customer details:
- On the Overview of Orders page, click the hyperlinked customer name in the Customer Full Name column.
- On the View Order page, scroll down to the Customer section and click the hyperlinked Reference.
Editing a billing address in the marketplace order
To edit a billing address:
- Next to the order you want to edit the billing address of, click View.
- On the View Order page, scroll down to the Customer section.
- Under the Billing address, click Edit. The Edit Address for Order page opens.
- Make the updates and click Save.
Reference information: Editing a billing address in the marketplace order
| ATTRIBUTE | DESCRIPTION |
|---|---|
| Salutation First Name Middle name Last Name | Customer’s salutation. If the other person is the point of contact for this new address, you need to populate the fields with the respective data. If the customer is the same, populate the fields with the same values. |
| Email Country Address line 1 Address line 2 | Fields where you enter the email and address information of the customer. |
| Company City Zip Code Po box | Customer’s company, city, zip code, and post office box number. |
| Phone Cell phone | Customer’s phone numbers. |
| Description | Description of the order. |
| Comment | Any specific comment regarding the customer or customer address (for example, “This address is going to be used only if the order costs less than 900 euros.”). |
Thank you!
For submitting the form