Manage merchants
Edit on GitHubOn the Merchants page, you can manage the merchants’ records and facilitate the merchant registration and approval process, as well as apply any changes to the existing merchants’ records. This document describes the procedures of creating and managing merchant records.
Prerequisites
To start managing merchants, navigate Marketplace > Merchants.
Each section contains reference information. Make sure to review it before you start, or look up the necessary information as you go through the process.
Creating merchants
To create a merchant, do the following:
- On the Merchants page, in the top right corner, click +Add Merchant.
- Fill in the required information.
- Click Save.
Reference information: Creating merchants
The following table describes the attributes you enter and select when creating merchants.
General tab
This tab contains the main merchant information.
| ATTRIBUTE | DESCRIPTION | REQUIRED |
|---|---|---|
| Name | Text field where you specify the name of the merchant that you create. | ✓ |
| Registration number | Text field where you specify the number assigned to the company at the point of registration. | |
| Merchant Reference | Text field where you specify a unique identifier between the administrator’s ERP and Spryker. | ✓ |
| Field where you specify the email address associated with the merchant. Note The email address is unique, meaning one value cannot be used for several merchants. If the merchant with the same email already exists, the following message is displayed for the Email field when trying to save the record: “Email is already used.” However, the email can be the same as the email of a Marketplace administrator that operates in the administration interface (Back Office). Note This email will be used by a merchant to log in to the Merchant Portal |
✓ | |
| Is Active | Checkbox that gets the merchant profile page on the Storefront online once checked. | |
| Store Relation | List of stores where the merchant is present. | |
| Merchant URL | Text field where, during editing, you can update the URL that is used to access the merchant profile. The profile URL is specified per locale. | ✓ |
| Warehouses | Name of the Warehouse assigned to the merchant. For more details about the warehouses, see Merchant Warehouse. |
Contact Person Details tab
This tab contains information about the contact person. The contact person information is going to be used to create a Merchant Admin User who will be able to log in to Merchant Portal.
| ATTRIBUTE | DESCRIPTION | REQUIRED |
|---|---|---|
| Title | Formal salutation for your contact person (for example, Mr, Ms, Mrs, Dr). There is no default value selected. | |
| Role | Text field where you can define the role the contact person performs. | |
| Phone | Text field where you can enter the phone number of the contact person. | |
| First Name | Text field where you can specify the first name of the contact person. | ✓ |
| Last Name | Text field where you can specify the last name of the contact person. | ✓ |
Merchant Profile tab
This tab includes the public information about the merchant that is displayed in the Storefront).
| ATTRIBUTE | DESCRIPTION | REQUIRED |
|---|---|---|
| Public Email | Text field where you specify the business/public email address for the merchant. | |
| Public Phone | Text field where you specify the merchant’s public phone number. | |
| Fax Number | Text field where you specify the merchant’s fax number. | |
| Logo URL | Text field where you can specify the logo URL for the merchant profile. | |
| Description | Text field where you can add a description for the merchant for a locale. | |
| Average Delivery Time | Text field where you specify the average time during which the order will be shipped for a locale. | |
| Banner URL | Text field where you can add a link to the merchant’s banner for a locale. | |
| Country | Drop-down list where you specify the country of the merchant’s business address. There is no value selected by default. | |
| Street | Text field where you specify the street of the merchant’s business address. | |
| Number | Text field where you can specify the number included in the merchant’s business address. | |
| Zip Code | Text field where you specify the ZIP code of the merchant’s business address. | |
| City | Text field where you specify the city of the merchant’s business address. | |
| Addition to Address | Text field where you can specify any additional information included in the merchant’s business address. | |
| Longitude | Text field that will be used to identify the merchant location. | |
| Latitude | Text field that will be used to identify the merchant location. |
Legal Information tab
This tab contains legal information that is displayed on the Merchant Profile page in the Storefront.
| ATTRIBUTE | DESCRIPTION | REQUIRED |
|---|---|---|
| Cancellation Policy | Standard WYSIWYG editor with text formatting options where you specify the cancellation policy for the merchant for a locale. | |
| Data Privacy | Standard WYSIWYG editor with text formatting options where you specify the data privacy statement for a locale. | |
| Imprint | Standard WYSIWYG editor with text formatting options where you specify imprint information for a locale. | |
| Terms and Conditions | Standard WYSIWYG editor with text formatting options where you specify the terms and conditions for the merchant for a locale. |
Users tab
This tab contains information about creating and editing merchant users for the merchant.
To restrict access to the Merchant Portal, on the Merchants page, in Actions, you can create merchant users only after the merchant is created. During the merchant creation process, this tab exists, but all the actions are disabled.”
Editing merchants
To edit a merchant, do the following:
- On the Merchants page, in the Actions column, for a merchant you want to edit, click Edit.
- On the Edit Merchant page, edit the merchant details.
- To save the changes, click Save.
Reference information: Editing merchants
The following table describes the attributes you enter and select when editing merchants.
Overview of Merchants page
On the Overview of Merchants page, you see a table with all the merchants. The following information is included in the table:
- Merchant ID
- Merchant Name
- Approval status. For more details about the statuses a merchant profile may have, check the merchant statuses section.
- Status (active/inactive). For more details about the statuses a merchant profile may have, check the merchant statuses section.
- Stores
- Actions
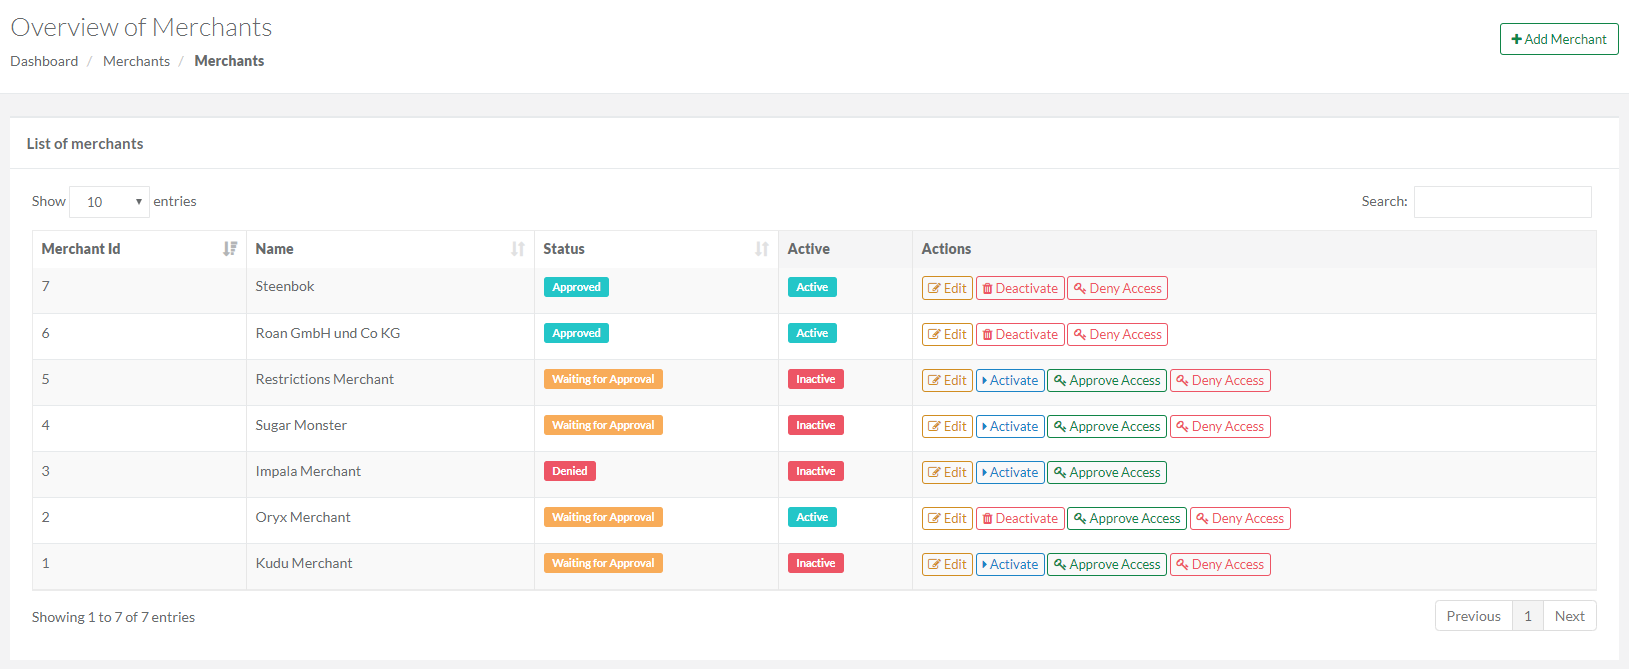
By default, the table is sorted by the merchant Id value.
You can sort the table by other values (Name and Status) using the respective sort icon in the needed column.
General tab
This tab contains the main merchant information.
| ATTRIBUTE | DESCRIPTION | REQUIRED |
|---|---|---|
| Name | Text field where you specify the name of the merchant that you edit. | ✓ |
| Registration number | Text field where you specify the number assigned to the company at the point of registration. | |
| Merchant Reference | Text field where you specify a unique identifier between the administrator’s ERP and Spryker. | ✓ |
| Field where you specify the email address associated with the merchant. Note The email address is unique, meaning one value cannot be used for several merchants. If the merchant with the same email already exists, the following message is displayed for the Email field when trying to save the record: “Email is already used.” However, the email can be the same as the email of a Marketplace administrator that operates in the administration interface (Back Office). Note This email will be used by a merchant to log in to the Merchant Portal” |
✓ | |
| Is Active | Checkbox that gets the merchant profile page on the Storefront online once checked. | |
| Store Relation | List of stores where the merchant is present. | |
| Merchant URL | Text field where, during editing, you can update the URL that is used to access the merchant profile. The profile URL is specified per locale. | ✓ |
| Warehouses | Name of the Warehouse assigned to the merchant. For more details about the warehouses, see Merchant Warehouse. |
Contact Person Details tab
This tab contains information about the contact person. The contact person information is going to be used to create a Merchant Admin User who will be able to log in to Merchant Portal.
| ATTRIBUTE | DESCRIPTION | REQUIRED |
|---|---|---|
| Title | Formal salutation for your contact person (for example, Mr, Ms, Mrs, Dr). There is no default value selected. | |
| Role | Text field where you can define the role the contact person performs. | |
| Phone | Text field where you can enter or change the phone number of the contact person. | |
| First Name | Text field where you can specify the first name of the contact person. | ✓ |
| Last Name | Text field where you can specify the last name of the contact person. | ✓ |
Merchant Profile tab
This tab includes the public information about the merchant that is displayed in the Storefront).
| ATTRIBUTE | DESCRIPTION | REQUIRED |
|---|---|---|
| Public Email | Text field where you specify the business/public email address for the merchant. | |
| Public Phone | Text field where you specify the merchant’s public phone number. | |
| Fax Number | Text field where you specify the merchant’s fax number. | |
| Logo URL | Text field where you can specify the logo URL for the merchant profile. | |
| Description | Text field where you can add a description for the merchant for a locale. | |
| Average Delivery Time | Text field where you specify the average time during which the order is shipped for a locale. | |
| Banner URL | Text field where you can add a link to the merchant’s banner for a locale. | |
| Country | Drop-down list where you specify the country of the merchant’s business address. There is no value selected by default. | |
| Street | Text field where you specify the street of the merchant’s business address. | |
| Number | Text field where you can specify the number included in the merchant’s business address. | |
| Zip Code | Text field where you specify the ZIP code of the merchant’s business address. | |
| City | Text field where you specify the city of the merchant’s business address. | |
| Addition to Address | Text field where you can specify any additional information included in the merchant’s business address. | |
| Longitude | Text field that is used to identify the merchant location. | |
| Latitude | Text field that is used to identify the merchant location. |
Legal Information tab
This tab contains legal information that is displayed on the Merchant Profile page in the Storefront.
| ATTRIBUTE | DESCRIPTION | REQUIRED |
|---|---|---|
| Cancellation Policy | Standard WYSIWYG editor with text formatting options where you specify the cancellation policy for the merchant for a locale. | |
| Data Privacy | Standard WYSIWYG editor with text formatting options where you specify the data privacy statement for a locale. | |
| Imprint | Standard WYSIWYG editor with text formatting options where you specify imprint information for a locale. | |
| Terms and Conditions | Standard WYSIWYG editor with text formatting options where you specify the terms and conditions for the merchant for a locale. |
Users tab
This tab contains information about creating and editing merchant users for the merchant.
To restrict access to the Merchant Portal, on the Merchants page, in Actions, you can create merchant users only after the merchant is created. During the merchant creation process, this tab exists, but all the actions are disabled.
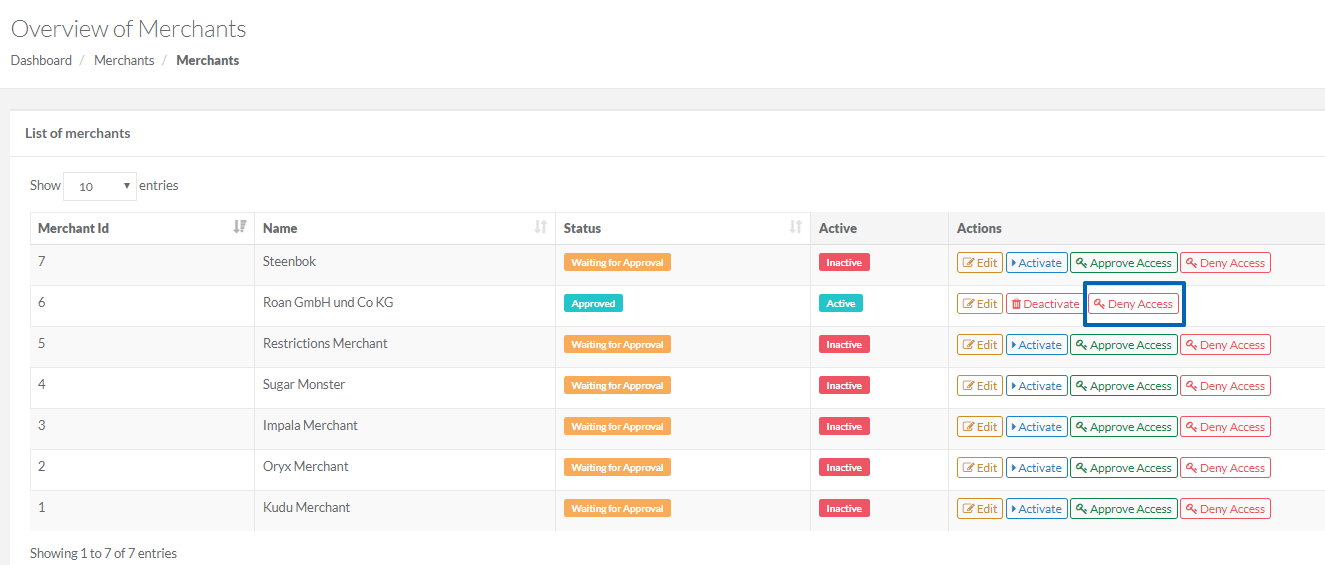
Approving and denying merchants
Merchant approval is the process when a Marketplace administrator changes the status of the merchant record according to the flow described in the Merchant statuses section. After the initial merchant registration, the status is always set to Waiting for Approval and is subject to change by a Marketplace administrator after their review. To approve the merchant, click Approve Access in the Actions column of the Merchants page.
To restrict access to the Merchant Portal, on the Merchants page, in the Actions column, click Deny Access.
Activating and deactivating merchants
Activating or deactivating the merchant indicates whether the merchant profile page, product offers, and marketplace products are available in the Storefront or not. To activate the merchant, click Activate in the Actions column of the Merchants page.
You can deactivate the merchant by clicking Deactivate on the Merchants page in the Actions column.

You can not delete merchants, you can only deactivate them.
What’s next?
Once you have the merchant record available in the system, you can proceed with creating a merchant user to log in to the Merchant Portal.
To know how to create those, see the Managing merchant users.
Thank you!
For submitting the form